
How do you make an NFT? That’s an increasingly popular question now that NFTs are so popular. One NFT after another is selling for tons, which is why more and more people want to create their own NFTs.
The NFT market is now worth $41 billion and it is getting closer and closer to the regular art market. Major public figures such as Elon Musk, Eminem, and Gary Vee have already created and sold NFTs. These NFTs have been sold for colossal amounts. This is one of the reasons why many people find non-fungible tokens so interesting.
But how do you make an NFT yourself? What does this process look like from start to finish? That’s what we’re going to look at today! Let’s get started quickly.
Step 1: Choose a theme
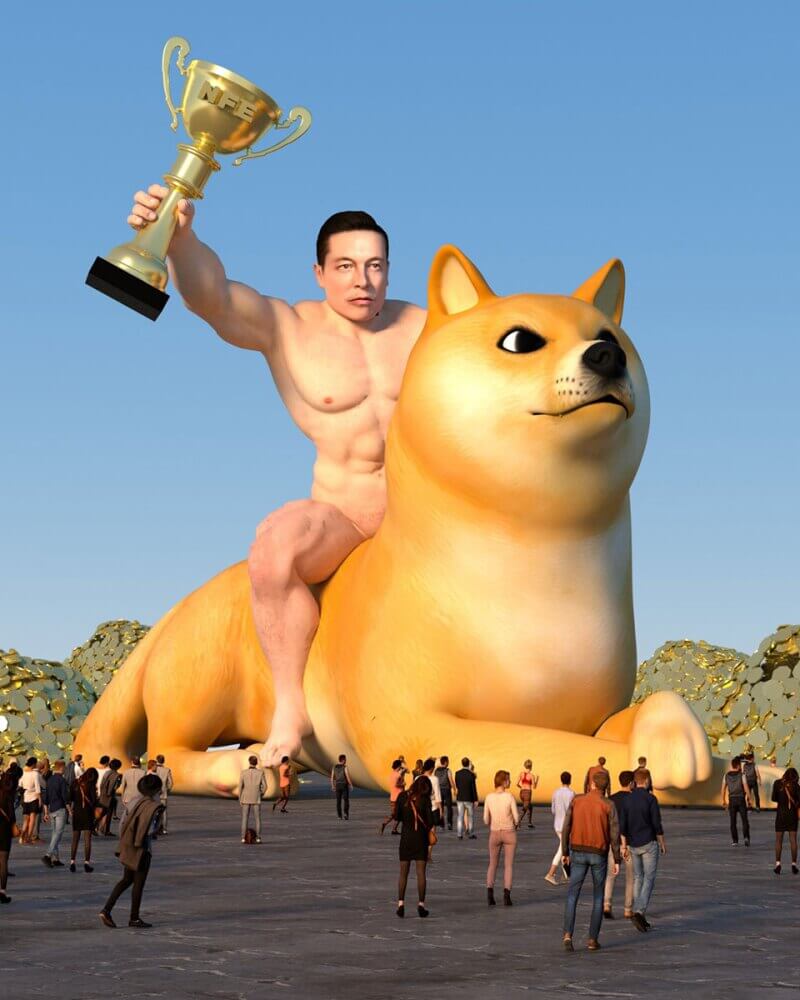
The first step in creating an NFT is choosing a theme. Almost all successful NFTs have a clear theme. Just look at Beeple, the maker of the most expensive-selling NFT to date. Beeple has been an artist for almost 15 years and has always chosen interesting themes. For example, one of his collections, the GIGACHADcollection, consists of 100 NFTs in which Elon Musk, the GIGACHAD, exhausts his Doge (referring to Dogecoin). Beeple also often chooses to create art about politics or other current topics.
Animals have also been a popular theme for a long time. One successful animal collection after another was released. You had the Bored Ape Yacht Club, The Doge Pound, the Cool Monkes Genesis, the Phantabear , and the X Rabbits Club, and we could go on for hours.
In addition, NFTs that can be used as a profile picture often appear to do well. This is because people like to show what they have, as shown again in NFTs. If you start looking in the top 100 collections on OpenSea right now, you will see that almost every one of these 100 collections is some kind of character collection. These NFTs could therefore be used as a profile picture.
What’s especially important, from a potential success perspective, is that you choose a theme that stands out. Thousands of NFTs are created every day today and there is a very good chance that your NFT will be ‘buried’, as it were, under all the other NFTs that come out. So if you want to stand a chance of standing out, you have to make sure that you do something unique, something that the others are not doing.
What’s even more important, though, is that you choose a theme that you like. The process should also be fun for yourself because if you do it purely for the opportunity to make money, it will probably never be a success.
Step 2: Create the Art
Once you have a theme and an idea of what your NFT should be, it’s time to create the actual art. You can do this in different ways, depending on what you want.
For example, you could choose to draw or paint something by hand. You could then scan this in and turn it into a JPEG.
You can also create something yourself in a digital program, such as Photoshop. Photoshop costs money, though. If you don’t think it’s worth it, you can also opt for a free alternative, such as Paint.net or Figma.
Another option is that you will take pictures because photography can also be made into NFTs. Are you a photographer? Or do you have beautiful photos from an old holiday? You can also make these into NFT.
Another option is to hire an artist. You can do this, for example, via Fiverr or Upwork. What’s important is that the full commercial rights go to you, otherwise you could get into trouble later. So always ask extra for this.
It doesn’t stop there. Do you make music? Do you play guitar or piano? You can also make this an NFT. Record it and make an NFT of the MP3 file.
As you can see, the possibilities are endless. As long as your artwork can be made into a file, it can be an NFT. So be creative, then you will achieve the best results.
It is very important that you only create NFTs for which the commercial rights are held by you. If not, you could end up in trouble later in the process, and you want to avoid this. So make sure you don’t use anything that doesn’t belong to you. No photos that you don’t own the rights to, no music by other artists, no fonts that you are not allowed to use, etc. Everything you use must be homemade, or completely copyright-free.
Step 3: Define the Details
Now that you’ve created the art, it’s time to determine the details of your NFT. There are still several choices to make before you can actually start creating your NFT.
The first choice you have to make is which blockchain you will put your NFT on. Where NFTs started on Ethereum, there are now several blockchains that you can use for NFTs. Let’s take a look at the different blockchains that allow NFTs, but also which marketplaces belong to these chains.
- Ethereum. Ethereum is still the most widely used chain when it comes to NFTs. However, for beginners, there is a downside to Ethereum. Ethereum is relatively expensive. Of course, there are also many advantages to Ethereum. Ethereum certainly has the biggest name when it comes to NFTs and there are a lot of potential buyers. If you want to use Ethereum, you can, for example, choose 1 of the 2 largest marketplaces: OpenSea and Rarible.
- solana. Another popular chain for NFTs is Solana. One advantage of Solana for beginners is that Solana is very cheap. On Solana you pay only $0.00025 per transaction, whereas on Ethereum this will be between $10 and $150, depending on how busy the network is. Do you want to use Solana? Then Solanart or Solsea is suitable for you.
- polygon. You can also use Polygon. Polygon is a layer 2 on Ethereum. However, the costs are much lower with Polygon than with Ethereum, where you pay on average about $1. An advantage is that you can use the same marketplaces as with Ethereum. You can use both OpenSea and Rarible .
These are by no means all the possibilities, but they are the main ones. For the remainder of this blog, we choose Ethereum, with Rarible as its marketplace. This is because it is very easy to create an NFT via Rarible. However, this is completely up to you. All options have their advantages and disadvantages, but ultimately they all work.
When you know which blockchain and marketplace you want to use, it is time for several other choices. First, you will need to come up with a name and description for your NFT. What’s your name NFT? And what does this NFT mean? That is what you should try to describe here as best as possible.
Next, you have to decide how many versions of the NFT to release. You can release as many as you want. So you could also release the same artwork 1,000 times. However, scarcity is one of the reasons that many NFTs go up in price, so you have to weigh this up for yourself.
Then there is another important point, which is the royalties. You can also set royalties on your NFT. When you do this, you retain a part of the NFT’s right to profit. If someone then buys your NFT and then resells it, you will receive a piece of this sale amount. How much this is depends on the percentage you set. While it certainly sounds appealing to set the highest royalty rate possible, it can also make people hesitant to buy the NFT because it will be more difficult to recoup in the future, as they have to take part of the give the sales amount to you. So you will have to make that decision for yourself.
Step 4: Create the NFT
We have already arrived at the last step: actually creating the NFT. As we mentioned earlier, for this example we will choose an NFT on the Ethereum network and we will use the Rarible marketplace. An advantage of Rarible is that the NFT automatically ends up on OpenSea. In addition, Rarible is very user-friendly and it is very easy to create an NFT. But how do you do that?
First, let’s take a quick look at what you need:
- A MetaMask wallet. You will use this to pay for the NFT. Later on, you will also use it to receive the sales amount (and possible royalties).
- ETH (in your MetaMask wallet). You will use this to pay the gas fees that come with minting the NFT. For example, you can purchase ETH via Bitvavo, Binance, or Kucoin.
Now that we have everything it takes to get started creating the NFT, let’s get started.
- The first thing we need to do is ‘login’, by linking our wallet to Rarible. To do this, we click on ‘Sign in‘ in the top right corner of the Home page, and then on ‘Sign in with MetaMask‘. Our wallet will now open and after clicking on ‘Connect‘ we are logged in.
- In the top right corner is now the ‘Create‘ button. We click on that.at ‘Ethereum’Create.
- You will now be faced with the choice of ‘Single’ or ‘Multiple’. If you want to make 1 version of your NFT, click on ‘Single’, if you want to make multiple versions of your NFT, click on ‘Multiple’. In this case, we choose ‘Single‘.
- Now it’s time to insert your file. As you can see, you can insert PNG, GIF, WEBP, MP4, and MP3 files. You can do this by dragging your file into the box, or clicking ‘Choose File‘.
- You then have to choose how you want to sell your NFT. You can choose from ‘Fixed price‘, in which case you will attach a fixed price to your NFT, ‘Open for bids‘ in which case you will receive bids that you can manually accept or reject, and ‘Timed auction‘, in which case there will be bids can be made within a specified time, of which the highest bid is accepted at the end of this time and the NFT is sold. Here you can also enter things like prices and minimum bids. Remember that 2.5% of this amount will go to Rarible.
- After this, you can choose ‘Free minting‘ or not. When you choose ‘Free minting’ you are not the one who mints (and therefore pays the gas fee), but the buyer. This way you save costs and you can get your NFT on the market for free.
- The next step is to set the name and description you wrote earlier. So you only need to fill this in here.
- The last step is to set the ‘Royalties‘. Enter the percentage you have chosen here.
- Under “Advanced settings” you can add a few more things. Let’s leave that for now.
The last step is now ‘Create item‘. Congratulations! You made your first NFT! Now it’s time to promote your NFT and hope it sells.
Do you want to take it all in again through a video? The video below tells you how you can place an NFT on the blockchain yourself.
PRO TIP: There are also platforms where you upload your images and that take almost everything out of your hands for you. ThirdWeb and LaunchMyNFT are such platforms.
Conclusion
Today we looked at how you can make an NFT! Something that many people have become interested in after the raging success of many NFT collections.
We looked at the entire process from start to finish, so that you can get the most out of creating your own NFTs. Good luck!